Welcome to Sandata EVV! In this System Administration guide, we'll guide you through the necessary skills for effective system management.
Note: If a user's email changes, the administrator should delete the current user profile and create a new one using the new updated email. For example: If your program uses Single Sign-On, your Sandata email and your email for the state program login must be the same.
1. Introduction This powerful Electronic Visit Verification (EVV) system is designed to help healthcare providers and agencies manage client and employee data, track and manage visits, and submit claims for billing.
Review this selection of articles to help you get started with the basics of using Sandata EVV.
Getting Started in Sandata EVV – Sandata Technologies
2. Managing System Users User accounts are used to log in to the EVV system. Each account has individual settings, roles, and privileges that you can use to grant users access to the system. You can use the Manage Users module to view, edit, and create user accounts.
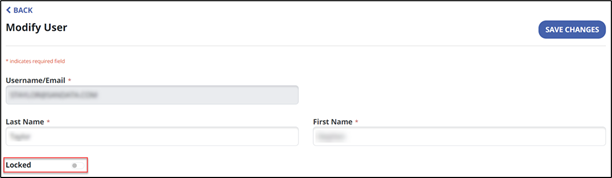
3. Account Lock Feature When you add a user, their account defaults to "unlocked."
You can manually lock an account if the user is unavailable for an extended period of time. Accounts can also be locked by the system after too many unsuccessful log in attempts.
To lock or unlock an account, use the Locked toggle switch to the appropriate position.
4. Managing User Roles Those with System Administration permissions have access to managing User Roles. A set of defined User roles is pre-loaded in the system, such as Security Administrator and Coordinator, where a group of system privileges are combined into a single, assignable role. When you assign a user to a User Role, that staff member is given all the privileges assigned to that role.
When you make edits to a User Role, this will affect all users assigned that role. You can also create a new User Role and assign only specific privileges to that role.
Select Create User Role. Enter the Role Name.
Enter the Role Description. This is an important way to define the role. For example, a Role called “Reporter” may be someone that runs reports and has access to the reporting module but may not have access to the Scheduling module.
Select a privilege and use the assignment buttons to move privileges between the Available Privileges and Assigned Privileges sections. Available Privileges are all privileges available that can be assigned. Assigned Privileges represent all privileges currently assigned to this user.
To add or remove privileges, select from either column, then use the arrow buttons to move the role between the Available Privileges and Assigned Privileges columns. If needed, you can assign multiple privileges to a user.
Select Save Changes when done.
5. Modifying a User Role
You can use the Manage User Roles screen to edit existing user roles that you have created.
In the Manage Users screen, select the role name you need to edit.
Change the system privileges for the role by moving them between the Available Privileges field and the Assigned Privileges field.
Select Save Changes when done.
6. Deleting a User Role
If you created a User Role that you no longer need, you can delete it.
Go to the Manage User Roles screen.
Select the Delete icon
In the pop-up window, choose Yes, Delete. To discard changes, click Cancel. This removes the user role you added.
7. EVV Add Employee with Mobile App Access Role
Watch this video to learn how to add employees to Sandata EVV, and to provide access to the Sandata Mobile Connect app.
8. Resetting a User's Password
Users with the proper permissions can reset a user’s password by sending them a reset password email.
1. Start at the Manage Users screen. (Security Manage Users)
2. Click on Filters to search for the user
3. Enter the name or username and click Apply Filters. Select Clear to remove any filters.
4. Select the user by clicking on the row. In the Edit User Screen, select RESET PASSWORD. A temporary password is emailed to the user. • The temporary password will expire if it is not used to log into the system within a set period of time. • When logging into the system using a temporary password, the user will be prompted to create a new permanent password.
5. A confirmation box appears to confirm the password reset. Click Ok. Select Cancel to remove any changes.
Comments
0 comments
Please sign in to leave a comment.